We may earn a commission from the affiliate links on this site. Learn more›
Playback rig, backing tracks player, playback system, tracks machine, whatever you call it — I’ll teach you how to set one up in this article.
Let’s face it — modern music is perfect. Arrangements and recordings are perfectly quantized (time-aligned to a grid) in almost all popular recordings. Many musicians still try to fight against the grain to maintain a sense of personal integrity.
The vast majority of other bands (your competition) will be sacrificing this honesty to win in the eyes of innocent concert-goers. If you and your band decide to steer down the road of using backing tracks, it’s important to understand how to implement such a system and realize the risks associated.
What is a Backing Track?
Simply put, backing tracks are pre-recorded pieces of music that a band or artist plays-along to in a live performance, video, or just for fun at home.
Backing tracks are extremely common among today’s live artists for enhancing performances. They’re relatively easy to integrate into a show and are much more affordable than hiring additional musicians. Backing tracks are different from karaoke versions of songs or drumless tracks.
You can set up a backing tracks player with just a laptop computer, a
Many bands of the past have used MP3 players with a stereo audio splitter, but I find this is not as reliable anymore and you will be much better off by using a computer, specifically a MacBook Pro.

Have you ever been to a show and noticed one or two MacBook Pros on stage with the musicians? These computers are most likely either running a playback system or providing virtual instruments to be used by a MIDI controller (or a combination of the two).
Is Playing With Backing Tracks Cheating?
I can’t say either way, but I generally don’t believe using backing tracks is cheating if you’re a band or artist. Certainly, it is easier to play along with an existing recording of music. Using tracks allows for an entirely different performance, one that isn’t possible with solely musicians on stage.
And that in itself may be the issue entirely. An organic ensemble of musicians on stage will always have its magic, but I won’t criticize artists who use backing tracks.
Lots, and I mean lots, of musicians look down on the idea of using a playback system. But not everyone does. Take for instance this video from Adam Neely. He explains it perfectly that there is a case for both.
This is not an article debating for or against the use of one, rather it is merely a “how-to” guide if you decide to implement one.
Benefits of Using a Backing Track Player for Your Band
Creating your own playback system for use live has a number of positive benefits, primarily those associated with better reception of your show.
Better Sounding Live Shows
You may have additional vocals on your studio production. Using tracks can enhance your show by “playing back” these recordings while playing live.
Bigger Sound Without Hiring Additional Musicians
Again, one of the many reasons why musicians frown upon the idea of tracks is this in itself. However, hiring additional musicians is expensive, especially in the early days of your career. You can achieve a bigger sound without increasing your budget.
Extensive Pre-Programmed Arrangements
Live shows are meant to wow an audience; tracks give you the ability to do just that. Your creativity is unlimited. With a playback system you can create anything you can dream up.
Whether that be a narrated voice you interact with, a crazy introduction, or interesting sound design throughout the show, there are unlimited possibilities.
Downfalls of Using Backing Tracks Live
Just like with anything in life, using a playback system has its drawbacks.
You Must Play with a Click Track, Generally
Get used to playing to a beeping in your ear, as you’ll need a click track to stay on with a track system.
While you don’t have to use a click track in your setup, it’s going to be much easier, especially in breaks where there are no tracks going on.
When I initially began designing our playback system, I was determined we wouldn’t be using click tracks. I had a naive notion that all the samples would be triggered in realtime.
Because I could hear samples in my ears loudly, and since I am a solid timekeeper, I figured syncing up to these sections would be no problem.
For certain sections of songs, I would trigger samples, and for others, Chris would take care of it with his FCB1010 and other various pre-programmed keys on his 88-key controller.
It was a lofty idea and implementation was far more difficult than I expected. The setup was overly complicated and required days of extra work to design, prep, and then rehearse songs.
Eventually, I succumbed to the idea of simply using Ableton Live and our stems from studio sessions.
Setup Time is Longer Before a Show
In order to make sure everything is working properly, soundchecks will take a lot longer. Additional inputs, computers, and technology will lend its hand to issues always.
Technical Issues Will Arise
With the introduction of computers and technology to your show, there will be problems. This is a fact, no matter who you talk to. Playback systems have the ability to skip, cut out, and even crash during your show.
You’ll need to be on top of everything to make sure you have a failsafe alternative in the event that your playback system goes down.
There is a Bit of a Learning Curve
It took me years to figure out exactly how I wanted our playback system to work. This is why I’m writing this today, so you can avoid the mistakes I made early on.
There is one additional downfall to using a playback system. While rehearsing with my band, if we need to hit a particular section of a song for practice, there’s really no other way to do it other than to play through the entirety of the song or practice it without the track.
The Easiest Backing Tracks Player
Upon further thought, I have decided to include the steps to using an old iPod with a splitter cable.
Though I find these setups to be unreliable and unsustainable, they are worth noting for an absolute starting point for backing tracks.
The Old iPod for Playback Systems
Do you have an old iPod laying around in your house somewhere? Dig it out and charge it. We’re gonna use it for your backing tracks.
First, in your digital audio workstation, you are going to take all your backing tracks and pan them all the way to the left.
In the same project, add a click track and pan this all the way to the right.
Mix down and viola, you have a backing track. Sync it to your iPod and you’re good to go.
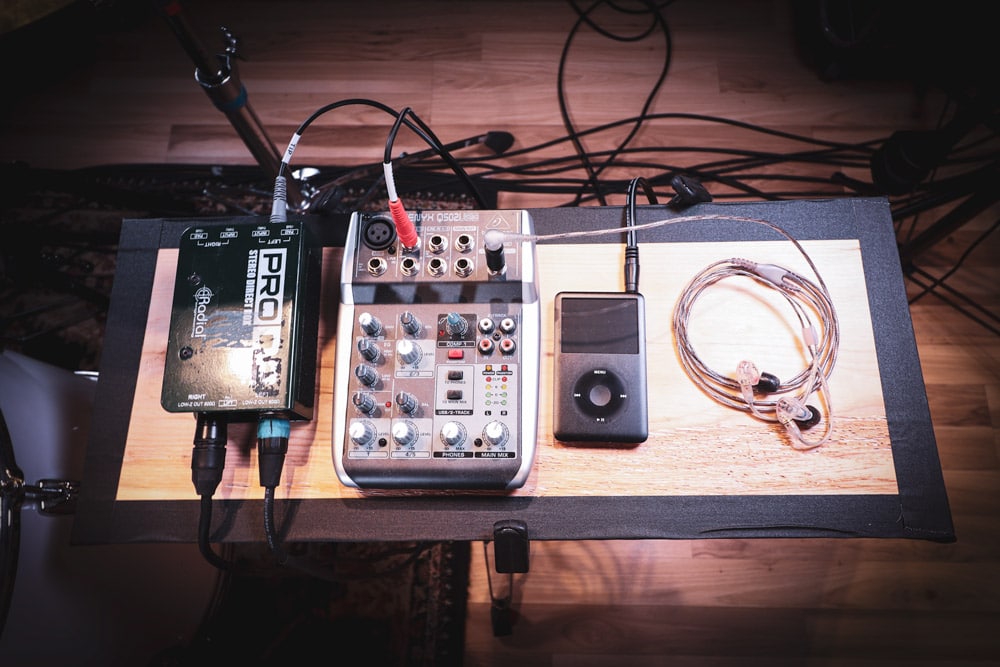
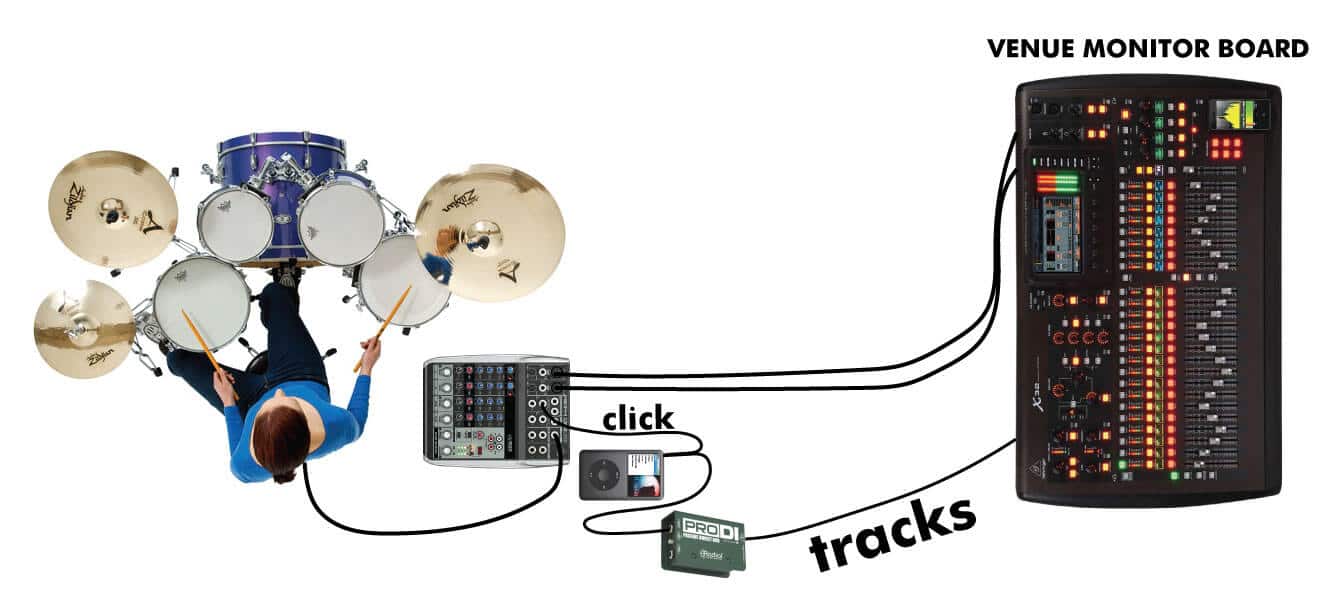
Now, for getting this going live, we will need to purchase a couple things.
- Stereo DI Box; I recommend the Radial Pro DI (you can get away with using a mono DI, but if you plan to upgrade your system in the future to our next solution, get stereo)
- A small mixer (to hear the click and mix from monitor board)
- 3.5mm TRS to Dual 1/4 TS Audio Cable; TNP makes a decent cable
Our live setup is getting a little more complicated.
Because we now have three pieces of gear on the ground, it might be better to use a trap table or something to hold them off the ground.
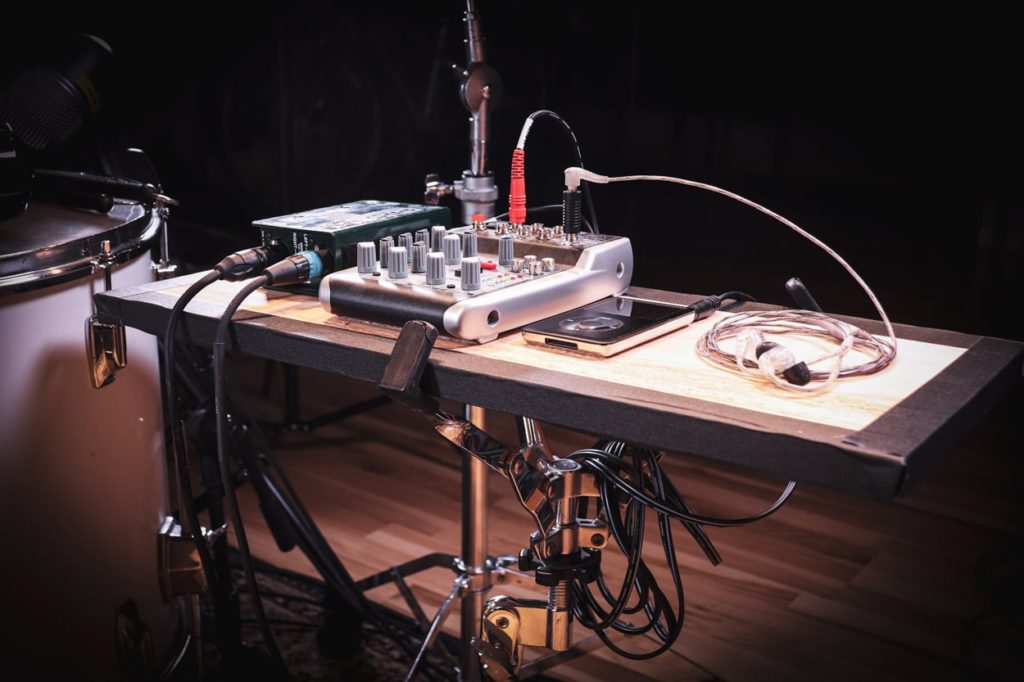
When I first started out, I used a piece of wood and a snare stand. For the purposes of the article, I have recreated that exact setup. For the sides, I used gaffers tape to dull the edges.
This used to be the most recommended option on internet forums to playback your tracks.
While, yes, it’s probably the most affordable option available, I think by today’s standards, most people also have a laptop they can integrate into this setup.
I would always opt for this.
Using a Laptop for Your Playback System

This is a much more expensive route, but one that will save you in the long run.
Having a laptop running tracks with, say, Ableton Live, gives you the potential to have multiple outputs and many stereo signals going to your front of house engineer.
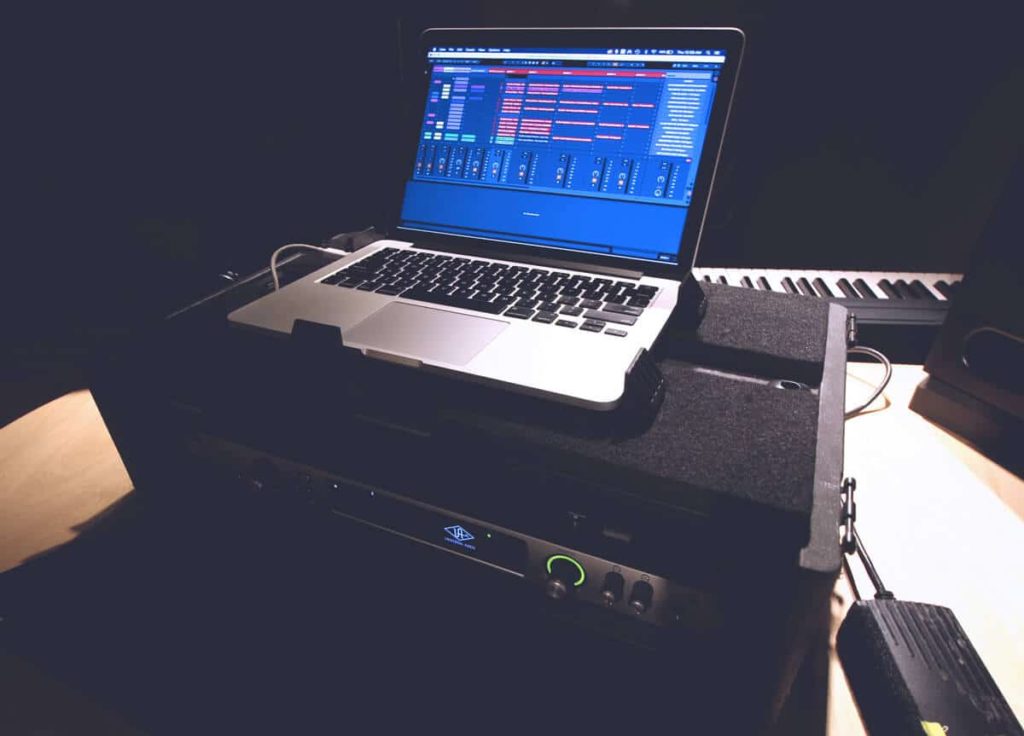
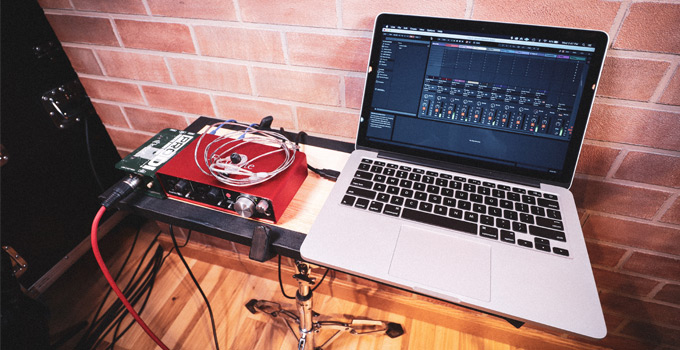
For example, you could route keyboard tracks in stereo separate of any bass tracks! In this method, we will need a laptop, an audio interface, and a Radial Pro D8. Here’s a picture example:

Your laptop will connect to the top unit, the MOTU 828 mk3 via USB. Playback will be done inside Ableton Live and you will get your click from the headphone out on the MOTU.
From here, you will need to add 8 patch cables from each of the analog outputs on the MOTU 828 mk3.
The front of house will take 8 XLR cables from the back of your Radial Pro D8 and you will have sent 8 channels of tracks to FOH!
Is it overkill? Maybe. But your sound engineer will love having everything split up this way.
Here’s what I love about this setup:
Full control: By utilizing music software like Ableton, you’re able to pre-program your entire show to your liking. But, let’s pick a software first (though I do recommend Ableton Live).
The Best Backing Track Apps for Live Performance
- Ableton Live — most common software for running tracks
- Digital Performer — Utilized by Playback Control (a company that designs a done-for-you playback system)
- Idoru — no laptop needed, not available yet
- LiveTraker — a dedicated backing tracks software
- ShowOne — iOS app for running backing tracks live
No matter which software you choose, you’ll have the ability to move songs around on the fly and create different set lists for different shows with ease.
Portable: The setup you see here can easily fit in a small pedal board case and will set next to your drum set on stage (assuming you play drums).
Two (or four) channels of tracks: Most simple playback setups often rely on one channel of tracks and one channel of click.
My setup allows for two separate channels of tracks and even is expandable up to four (with another DI box).
This gives the front of house engineer more flexibility when mixing, allowing your band to sound better on stage.
Personal mix: By taking either a mono send or stereo send from the monitor engineer at the show, you’ll have full control over the volume of your backing track, click, and monitor send to create the best mix for you.
I have since moved on and beyond this exact setup, but I still support this 100%. The setup I use now is far more complicated and costs a bit more to set up, as it integrates directly into our X32 Rack monitor board.
Required Gear
In order to implement this setup, here’s what you’ll need:
- Laptop – It’s pretty obvious, but MacBook Pros are pretty much the standard.
- Audio Interface – I recommend the MOTU UltraLite-mk4 for the best performance.
- In-Ear Monitors – Shure SE425s are now my go-to for live performance. For more information, read up on in-ear monitors.
- XLR Male to 1/4″ TRS Snake Cable – Depending on how many outputs you need will determine the number of channels you’ll need on the snake. ProCo makes an awesome snake — I recommend going with 20′ just in case you need the extra length at a gig.
- Digital Audio Workstation – Ableton Live works best for playback rigs, in my opinion.
- Two TRS Cables
- USB Cable
- SKB Studio Flyer (optional) — now, of course, you don’t need this rack, but I love mine. It keeps my computer safe on stage and even houses it in transit.
What is an audio interface and why is it necessary?
In the list above, I’ve recommended picking up the MOTU UltraLite-mk4. This piece of hardware is an audio interface that allows your computer to send audio signals to different outputs.
An audio interface helps your computer takes over the job of playing the audio, essentially making your computer more reliable and stable during shows (though, CoreAudio is rather good without an interface).
I suppose if you wanted to skip out on the audio interface, you could run mono backing tracks with a splitter cable, with the click panned to the right and the tracks to the left.
Sweetwater still sells Apple iPods, so there is that option as well, but I can’t recommend it.
As far as choosing an audio interface, there’s tons of options. I happen to like MOTU as a company. However, there is an even better option you should know about.
It has come to my attention recently from a user in the comments that

It’s an audio interface designed exclusively for playback systems.
The best feature? You can connect two laptops, both running the same Ableton session, to the interface and sync them.
In the event of one failing or skipping, the PlayAudio12 switches to the other computer seamlessly.
This is similar to the Radial SW8, but is far cheaper and easier to use.
The above setup using the MOTU UltraLite will only render four stereo channels of backing tracks, but you can have up to five stereo outs with the PlayAudio12.
Prepping your backing tracks for use
This step in the process can often be the most daunting. To use this setup, we’ll need to create our backing tracks a specific way.
There are many ways we can do this, but we basically need two things:
- Pre-mixed stereo .wav file
- Click track matching said .wav file
Inside your DAW, you’ll need to import your backing tracks (provided to you from your studio engineer) and create a click track that matches said track.
Create a separate audio channel and manually program in a click track aligned to the grid with samples of your choice.
I have included a .nki instrument (Kontakt) that makes it super easy to program a click track right below this paragraph (samples are included).
In my digital audio workstation, I have a Kontakt instrument that is specifically for making click tracks. You can download it below.
It’s very easy to copy and paste the MIDI around the session and create the perfect click track. I have uploaded this exact instrument here for you to use as well.
Once you have your click track and pre-mixed backing track done in your session, it’s time to bounce them down.
Depending on whether or not your created your click track inside of Ableton, this step may be irrelevant to you.
Inside your DAW on the export dialog box, look for something that is similar or the same to Batch Export.
We want to mix down the backing track on one stereo file and the click track on another.
Be sure to keep organized and always label click tracks to their appropriate songs, along with the tempos in the file names (trust me, it’ll save you later).
Setting up your Ableton session
Before we continue, it’s important to note that you can do a multitude of things in many different ways. This is just how I set my session up.
If you’re completely new to Ableton Live, I’d suggest watching this beginner’s starter guide to get familiar with the interface.
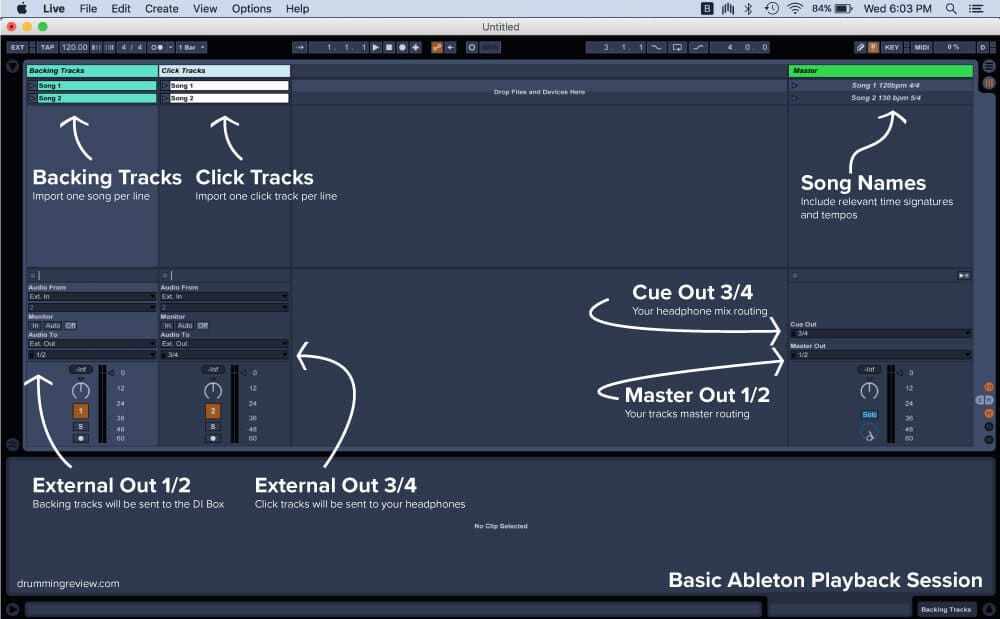
In the above image, you’ll note that I have two audio channels in cyan and white.
The first channel contains my backing tracks and is being sent to External Out 1/2. This output will serve as our backing track output.
The second channel in white is my click track channel. Be sure to match up each song with the correct click audio.
The click track channel is going to be sent to a different External Out: namely 3/4. This output will serve as our headphone mix output.
NOTE: Ableton Live defaults to warping your files!
What does this mean exactly? If you import an audio file into Ableton while it is set to a different tempo than what you’re importing, Live will automatically warp it to the tempo Live is set to.
If this is an issue for you, you need to select the clip that is warped and set it to the correct tempo in the bottom panel.
There is a setting inside preferences that will disable this from occurring!
Adding the tempo in the scene name will also prevent this from happening in a live show.
Getting your monitor mix inside your Ableton session
If you have the luxury to get a monitor mix at the venue, you’ll need another audio channel. Navigate to Create -> Audio Channel.
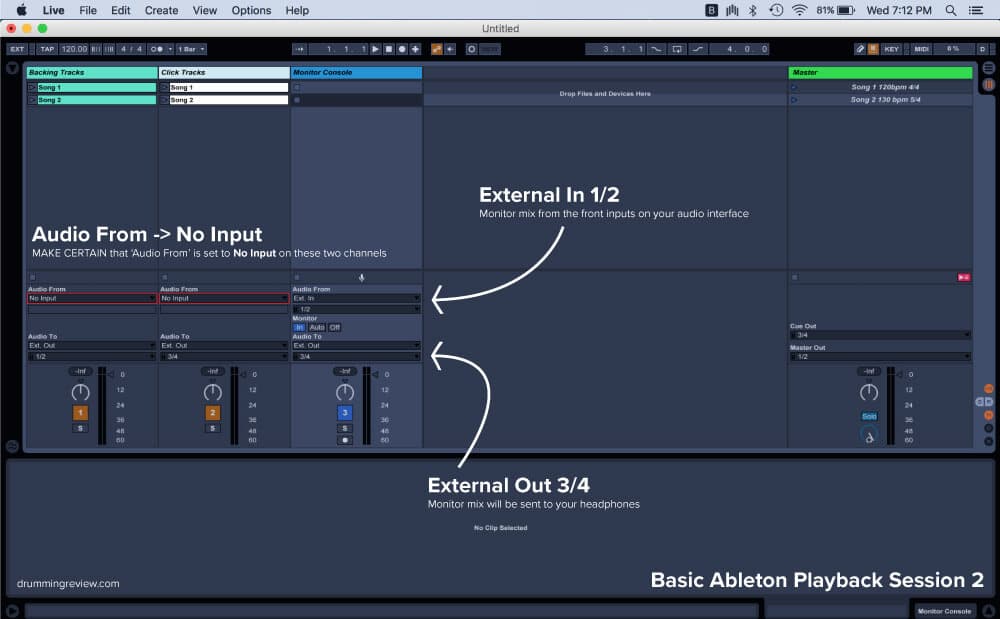
You’ll probably get either one or two XLR cables from the monitor engineer that will be connecting to the front inputs on your audio interface.
Inside your Ableton session on the new channel we just created, make sure Audio From -> Ext. In is set to 1/2.
Your other channels, Backing Tracks and Click Tracks, should have their Audio From set to None.
To avoid sending your monitor mix back to the PA, make sure your External Out on this new audio channel is set to 3/4 (your headphone mix).
Make sure to toggle the ‘In’ box under Monitor, else you will not hear any signal to your headphones!
Controlling your playback rig on stage
Now that we have our computer ready to go, it’s important to figure out how we’re gonna control this thing, right?
In Ableton, you can press the Enter or Return key to launch songs.
You’ll be able to see them highlighted, so you’ll know which one is set.
You can also use a MIDI controller to launch songs. I actually use a Roland SPD-SX to launch each individual song in our live set.
Making Soundcheck Smoother with Backing Tracks
After implementing a setup like this, it can often lead to a delay in soundcheck and many things going wrong.
Here are a few things you can do to ensure a fast soundcheck every night:
Have backups of all cables and accessories
This is a no-brainer and should apply to any gear you use in your band. Always keep backup cables, files, sticks, etc.
Create a “test track” to use at soundcheck
Sometimes our backing tracks take a minute to kick in.
You should make a separate backing track scene inside your Ableton session that kicks in right away and features your loudest volume, ensuring your sound engineer won’t be overwhelmed in the middle of the show.
Stage your gear off the stage prior to soundcheck
If you’re opening up for a band, always stage gear during their soundcheck (if allowed) to ensure the fastest soundcheck.
This can be setting up cymbal stands, connecting cables for your playback rig, etc.
Pack your setup efficiently
Design your playback rig in a way that doesn’t require you to take it completely apart.
Can you keep the laptop secured and velcroed to your pedalboard? Can it stay plugged in?
If so, do it. Any place you can cut out time helps in the high-stress environment known as the soundcheck.
Share your drum kit
I know this isn’t a drummers favorite option, but one way to make a stage less cluttered is to share the drum kit.
Whether you’re the headliner or the opening act, be open to this idea.
Keeping your gear safe
If you’re doing a lot of touring with your band, you’ll want to keep that laptop safe.
Having a playback system means that your laptop now is the most valuable thing in your possession. Losing it could mean canceling shows, or worse, the entire tour.
I suggest keeping a separate laptop for work and one for play.
What I mean is dedicate the playback laptop as band only, and your other one can be for daily activities such as checking email, watching videos, playing games, etc.
This way, you won’t have to worry about loading it up with a bunch of files and slowing it down.
The last thing you want in a playback system is an unreliable computer.
As far as transportation, you should find some sort of case and keep it locked up with all your other gear.
I house my laptop on tour in a Pelican case, though they can be pretty expensive. If budget is a concern I’d recommend checking out some of these affordable Pelican alternatives.
Do you use a playback rig? Let us know down below how your setup works. If you think we missed something or got something wrong, we’d still love to hear from you.
Thanks for reading!
With Abelton Live, you should be able to set up your tracks so that keys on your laptop trigger different sessions of a song. I haven’t done it personally, but I have seen a tutorial in the past that shows how to do this. As an example, you could program ‘c’ for chorus, ‘v’ for verse, ‘b’ for bridge, etc.
0
Yep!
This is totally possible. I haven’t done it personally because we haven’t had the need. If you have sections of a song that need to vamp or need to jump back to a certain section with ease, this is doable.
0
Total Ableton Live newbie question:
In session view (This is what I intend to use for playback): Can you somehow set locators up in a way so that you can jump or cycle eg. a solo section? Or do you need to line out all tracks an arrangements in arrangement view?
0
Hey Morten,
I’d have to dig in a little further to recreate that exact scenario, but I think it’s completely possible by MIDI mapping locators. Here’s a video showing it: https://www.youtube.com/watch?v=TxUTILjXfw8
0
What about the separate instruments in the backing tracks as different mixer channels? Any sound man will tell you that different rooms need a different mix. Can Ableton allow for mixing more bass, less drums, etc.?
0
Absolutely. Thanks for the comment, Mike. This is actually what I do with my band, though setting this up is a little trickier.
In my Ableton sessions I have group channels of Synths, Bass, Aux Percussion, and Harmonies that are all split out to different outputs. The X32 receives these different inputs on the back via ADAT. This is honestly the best system to have in place since it gives the FOH engineer total control of the mix, rather a pre-mixed bounce of everything.
The basic setup is:
Ableton Live -> Macbook Pro -> MOTU 828mk3 (outputs via ADAT) -> X32 Rack (in-ears) -> X32 Console (AES50).
The wonderful thing about this setup is you don’t need an XLR splitter or additional DI boxes for track inputs.
In a perfect world, we’d have two Macbook Pros with a Radial switcher in case one went down.
0
Probably late to this party, but instead of the Radial switcher, you may want to look at the iConnectivity PlayAudio12. $600 for failover of 10 channels of audio AND MIDI. Only downsides are it is USB 2.0, so it’s great with “older” laptops, and the MIDI output is Ethernet, so a peripheral (iConnectivity MIDI4+ $200) is needed, plus some setup learning curve. Once you get it set up though, it’s brilliant, small (half rack space for each unit) and works great. 2ms failover time means you don’t even hear the click get interrupted.
0
Steve,
You’re not late to the party; this is a game changer. Thank you so much for bringing this to my attention. The PlayAudio12 simplifies the workflow entirely, and it’s much more affordable. I wish I had heard of this prior!
0
Sorry for the long reply, but thought you’d be interested in the setup.
We use the PlayAudio12/MIDI4+ combo for our tribute band, and I just helped a pretty well-known metal band from the ‘80s switch over to it from their Radial system. (don’t know if it’s cool to mention them by name, so I’ll refrain). Ironically, with both of us the guitarists are the only ones using MIDI. The other thing I forgot to mention is that you need a MIDI device to plug in to the host port of the PlayAudio12 to start both computers simultaneously, but just about anything can be mapped to Ableton for this, so it can be really cheap. We use the AKAI MPD226. The pads are mapped to scenes (64 scenes can be fired across the 4 banks), and I have the faders set up to turn off individual tracks for times when we have a guest 2nd guitar etc. The rotary encoders are mapped to video scaling parameters in our video program which lives inside Ableton as a plugin. DMX and video are always sent from the second computer so if there’s a failover we still have that going. It has saved our skins a couple of times already, and we didn’t even know it failed over. Our drummer just happened to look at the laptops and notice the primary was dead, and none of us knew it had happened. Audio, Video, DMX, and MIDI were all still going strong. It’s definitely worth looking into if your setup has all those elements.
0
https://idoru.live/ – new hardware backing track player
0
Thanks, this looks fantastic! I haven’t heard of it yet, but I’d love to add it to the article if it’s as easy as it looks.
0
Hi guys, I just discovered this article. Does someone know an online article that describes more details/options for singers? Such as adding FX (compressor, delay, reverb) in different sections of the song. If I want for example, different FX in the chorus than in the verse, and so on.
Thanks!!
0
Hi Dan,
I hope you found the article somewhat helpful! I’m a little curious as to know how you stumbled upon it? It seems to be one of my most popular posts.. appreciate any insight.
Regarding your question though, the best way to go about doing this is to use a click track alongside pre-programmed automation within Ableton Live. The routing would look as follows:
Vocal Microphone -> Audio Interface -> Ableton Live -> Front of House (Audio Interface Out)
In the session, you’ll need a cue track (or a backing track) that helps keep you on pace with the effects.
The effects will trigger using the chain selector and manual automation of the “guide track.” I’m working on making a video demonstrating this that will be super easy to follow along with. Do you have a way I can send it to you?
Cheers!
0
Is it possible to create backing tracks without an audio interface?
0
Hi Peter,
Yes, it’s completely possible to make backing tracks without an audio interface. To create the backing tracks themselves, you’ll need to have files from the recording studio. The engineer usually can give them to you if you ask.
To play them live, you’ll need to set up tracks that have both the click track (on one of the channels) and the backing tracks on the other. To use them live, you’ll have to use your phone or an old iPod, mp3 player, etc with a left/right splitter and a DI box. It’s a little complicated, but it is the most affordable setup to start with.
Let me know if you have any questions — totally can help on this one! I can help you make the split tracks too, if you need.
0
Hi Nick. This is a GREAT article! Very helpful … thank you. I am just getting in to backing tracks. I am definitely not a techie. I am in a duo and will be doing shows of up to 60 songs. To start with I will be creating a few tracks on a DAW and/or downloading tracks from sites like ‘Karaoke Backing Tracks’. In the live setting our goal is to have the simplest setup possible … with the ability to create set lists as well as call up individual songs when requested. Is the setup described above the simplest way to go? Other options/suggestions? Many thanks! Stephen
0
Hey Stephen,
Thanks for the nice words! I suppose I’d start with a few questions:
— Do you have any gear already for the setup?
— How do you hear yourselves live? IE: stage monitors at venue, in ear monitors?
For a master setlist that includes all 60 songs, I think that can be done with Ableton Live. I’ve never reached that high in my Ableton sets, but I know you can program unlimited scenes (according to Ableton’s website). Bear in mind, if you buy the Intro version, you’re limited to only eight scenes (or eight songs in a set).
For calling up songs on request, it’s tricky. You could make separate genre-specific Ableton sets you load up when someone requests a song not currently in your live set. For example, one might be 70s hits, 80s hits, 2000s, etc. Obviously, the only downfall here, is you have to load a new set when this occurs.
The other question — how many separate instrument tracks will you have per song? (ie: bass, guitars, percussion, vocals, etc). The more tracks you introduce will affect your RAM in a large set list and it will be prone to skipping. I like to keep them separate (not mixed down together) so I can adjust volume levels if needed.
I would go simple — Ableton Live running on MacBook ⇒ Audio Interface ⇒ Stereo DI Box ⇒ House Mixing/Monitor Board
For the audio interface you pick, there’s too many options out there. I like the stuff from MOTU, but also have used UAD, Focusrite, Presonus, and others. If you want to save money, you could try the Scarlett 2i2, but I don’t know if I would trust it to be reliable. I’m using it on my desktop as I write this, and sometimes it crackles.
The PlayAUDIO12 is an audio interface designed exactly for backing tracks, though I have no direct experience using it.
For DI box, I like my ProD2 2-channel from Radial.
Let me know if you have questions. I can even help you make the Ableton set if you need.
Oh, and if you are buying gear, I couldn’t suggest anywhere else than Sweetwater.
Cheers,
0
Quick question,
If one were to just be sending 8 line level tracks from an interface (such as the Playaudio12) to FOH, do you still need a DI rack, or can you use a TRS to XLR loom? I saw this video and now I’m not sure if I need a DI rack. Any input would be greatly appreciated!
https://youtu.be/-YzcUxCJLfI?t=110
0
In my time using tracks (prior to switching to an ADAT system with the X32 consoles which uses just one ethernet cable for all signals), I used a rack of DIs, but I myself may have been misinformed in needing DI boxes. It’s quite possible it may be redundant, but I was always worried there would be some ground loop or issues with noise at FOH, so I always was safe.
Here’s the snake Eric talks about in the video: https://www.amazon.com/Seismic-Audio-SAXT-8x10M-Channel-Snake/dp/B0053HEHTU/ref=sr_1_5?keywords=8+channel+trs+to+xlr+snake&qid=1560513035&s=gateway&sr=8-5
Thanks for bringing this to the table — I’m going to update the article to omit the inclusion of a DI rack.
0
Thanks for the speedy response. The ground loop potential is the thing I’ve always worried about and questioned with a loom, but I’m going to try it out. $40 vs $800 for a Radial Engineering rack seems like it’s worth a shot.
Thanks for the speedy response and all the informative content you’ve posted!
0
Hi all,
Mark from Livetraker here. Congratulations for a so well written and complete post!
About software to manage everything in one place, I have to refer to our Livetraker, that allows musicians to make anything they want/need on stage using just ONE computer.
A full functional trial (no expiration) is available at our website: give it a try! 😉 https://livetraker.com
0
What about DAWless setup? What kind of hardware MIDI players for sending pre-prepared MIDI tracks to analog synths would you suggest?
0
Hi Nick
Nice piece ….. lots of info
Have you come across BakTrak ? its a great little pedal built for the job.
Three versions “BakTrak”, “BakTrak Pro” & “BakTrak MDE” you can select upto 48 tracks (MP3 and Wav) stored on a Micro SD card.
http://www.baktrakpedal.co.uk
Cheers Keith
0
hey, I’m wondering if there’s a way to use a backing track that doesn’t require in-ear monitors??? please advise 🙂
Thanks so much
0
Hi Sasha, thanks for the comment.
I think it is possible to use backing tracks without in-ear monitors, but it will be much more difficult. You’ll need to use regular wedge monitors and probably won’t be able to use a click track to stay on the track. If you do, the audience will hear the beeping coming through your wedge monitor.
If you have a backing track that uses a lot of percussion or drums, that could be one way to do it.
Another option — if you don’t have in-ear monitors, I think you could get away with it by using headphones. Let me know if you have any other questions. Maybe we can come up with a solution that works, but need some more information!
0
Hi
I created a free Max4Live patch that allow you to use Ableton Live’s Arrangement View instead of Session View for your backing tracks.
That way, you can sync all your audio with live’s tempo and measures so you can use midi as well, and it’s easier to prepare your session.
Also, you can start a song from any point, so your rehersals will be more productive.
You can check it out here: https://maxforlive.com/library/device/6245/backing-tracks
(sorry for my english)
0
hey there is a ton pf great information here. I have a Soundcraft 12 Mtk. I think this ellmenates the need for a seperate io device.
0
Hi Nick, thanks so much for this informative and objective article. I’m just starting out with a band, and we’ll be rehearsing songs that I wrote and recorded using Reason. We are a 7-piece band, but there will still be a few parts in each song that won’t be able to be played by a human. My thought is that I’ll just pull up my Reason session for whichever song we’re rehearsing, mute the tracks that won’t be used, then have everyone play to the tracks that *will* be used. I realize this is probably a crude way in which to go about it, but I’m a complete novice when it comes to this sort of stuff. Also, I realize that we’ll probably have to figure something else out for when we’re ready to actually take our show on the road.
Any insights, thoughts, ideas, or questions, would be greatly appreciated. Thanks so much!!!
0
Just thinking about my live set up in the good old days ……Oh geez it makes me shudder
It is amazing the changes from the first live playback set up I started with ,
One on desktop computer with a delta44 sound card
to the one we have now. A Hugely different beast.
It has defiantely evolved…..
So….self written app using browser, can select any song from 32 songs, on each members smart phone. Once play is hit , it triggers playback in reaper and changes drum,keyboard and vox fx patches . ( via midi ) It show the name of the song on everyones phone.
We now use 4 PCs without a single monitor on stage. Oh boy its heaven !
Our singer loves it, she just pics any song, (without order ) and play
My sound patches on the keys changes for me. and so does the drummers patches ( td 30 via drum samples ) even during a chorus or verse.
And yes our drummer is pretty good with a click.
0
Any opinions on Ableton vs livetracker? My band doesn’t use backing tracks currently (in the future I could see us using a few but not a lot), we will need to use a click so we can program lights to our songs and then have the drummer just hit a play button from on stage via Mac or iPad.
0
Great article. I’m just starting to consider adding a simple backing track system using Ableton Live. I’m the lead guitarist and currently run drums using a BeatBuddy which is controlled along with my Helix using a Morningstar MC8 controller. I’m hoping the BeatBuddy can act as a replacement to a click track since all drum tracks incorporate some form of drum count in which we’re all used to using and should be able to be synchronized with Ableton tracks. I’m trying to figure out if Ableton’s BPM can be set or synchronized with the BeatBuddy as the master MIDI clock.
Since our needs in this regard are quite simple and we only need to add pads or keyboards and maybe some horns I’m wondering if using MIDI tracks in Ableton rather than audio tracks would be a better option for us.
0
Very interesting article. Personally, I use jamorphosia.com/en for create backing tracks from mp3 files.
0
Hey Nick,
I got two question:
The first one is, if you add a click and cues with midi can you transform it to audio, so you can put it next to your backing tracks that are t an audio file. Or can you just add a midi track next to an audio track? I’m sure there are downloadable clicks in the Tempo you need it, so you can put it into an audio file, but you can’t just download cues. You can program cues and click in Ableton, using midi.
Other question:
Let’s say i set up a backing track and everything works how it should. Obviously the singer, guitarist or whatever will need another backing track than me as a drummer. Do I need to create a separate backing track for evey single person that needs one, f.eg. for the singer without vocals and so on and so forth? I still don’t quite get it but I’m gonna read through it again and probably I’ll get it eventually.
Two other question tho:
If I run the backing tracks, do I always start the songs/stop the songs?
Last question:
Why do you need to interfaces? I think you wrote that you need an audio interface and the Motu 828 mk3, if it was called like that. But isn’t the Motu an audio Interface?
0
You can use easily the PEDAL PLAYER stompbox and with just one small pedal you will solve all your problems during the live execution. All tracks and clicks must be prepared at home with your preferred DAW and must be at same bit rate and length, that’s all folks!
1. No DAW on the stage
2. Dual Player of 2 synchronized Stereo MP3 Audio Tracks. RCA Stereo/Jack Mono output for each channel.
3. ROUTER Wi-Fi embedded for video and Lyrics/Music Scores/PDF change Automation.
4. REMOTE MIDI AUTOMATION CONTROLLER for a complete Automation of your Live Equipment through MIDI OUT port.
5. A-B LOOPER Studio Mode
6. METRONOME flexible with different Click samples, linked to each song
7. TABLET-PC OUT (PDF) to connect until 3 different TABLET-PC through Wi-Fi Network with automatic page change with an user friendly Learning Recording Interface.
8. OLED Display high definition high brillance
9. VIDEO OUT to Projectors or HDMI-in/ Wi-Fi sources through any Android or Web2TV Device usage combination.
10. MUSIC STICK READER to immediately listen your favorite music songs during pre-concert phase
11. HEADPHONES Minijack stereo A/B/A+B source
12. FOOTSWITCH for manual/foot page change on PC Tablet
Check it out.
http://www.poom.it
https://www.youtube.com/watch?v=9jTDP4P8Woc&feature=youtu.be
0
So I’m really totally new to all of that ableton and in general live sets. But a thing that I just don’t get: How do you connect your iem’s to the line output 3/4 on the interface? And is it possible to get every single instrument from the live monitors sent inside ableton so you can adjust the volume of every single instrument? I’m just asking because the band I’m playing with doesn’t have any sound engineers or so. Also, forget about the question I asked a few days ago:)
0
Hey,
Here I am again. I got another question: Can you somehow get the click and cues from your ableton session sent to the digital mixer so that every band member can listen to the click and cues from your ableton session? If yes, how?
0
A couple of years ago I successfully used an iPod Classic, in an attachment on my mic stand, to play our backing tracks. I’ve dug it out to use in new duo project but I’ve forgotten how to switch off continuous play. Do you happen to know how to do that by any chance? I know I used to have it setup so that when a song I’d selected finished playing the iPod would return to the song list waiting for my next choice. But now I can’t figure out what setting(s) needs to be made to achieve that!
0
I like how your setup allows for two separate channels of tracks. That is the kind of setup I want. So I’ll start saving some money and see what I can get myself into.
0
You can take all of this a step further by building a closed IEM system along with it. It requires quite a bit more gear, though, and gets more spendy. What I have for my setup involves a 16 channel signal splitter snake, an interface with 16 outputs, a 16 channel digital mixer with 4 auxiliary outputs, and our wireless IEM units/body packs. The DAW routs everything to outputs on my interface that then go to the splitter (so FOH can have separate signals for each item/instrument that’s running through the system) and from there, into the mixer. The mixer allows us to have 5 customized in ear monitor mixes that each member can mix to their liking. I happened to have enough room left in my rack for a power amp, so in essence, the whole system doubles as our PA for rehearsals.
0
How about devices like the Cymatic Audio LP-16 or utrack24? Asking because there aren’t many dedicated multitrack playback devices without a laptop and DAW.
0
I haven’t any experiences with those devices myself, but they look like they might be able to get the job done.
0
Hi. Is there a software/DAW that can Run Wav files, a click and at least one video at the same time. I saw LiveTraker but the trial is infected by a SpyWare so I won’t even install it. I do need a backing track player that can do both, audio and video. I am currently using Studio One “Show page” but it lacks video support.
0
Oh, yikes! I should remove that from the list immediately if that’s the case. Sorry about that. Maybe they were hacked or something.
I think Ableton Live can run video and backing tracks at the same time, but to be honest, I’ve never used video in that regard before.
0
Hi, This is a fantastic article. I’d love to have a Zoom call with someone to help me nut out a change in our setup.
I have been using backing tracks for years, done the old way.
I programme midi files in an old version of Cakewalk, including midi patch changes for vocal effects, guitar patches and lighting patches.
I use a dedicated midi file player (Merish Live), which plays stereo backing tracks (bass and keys), and sends an midi output that runs an Alesis Dm5 for click, and then downstream to our other devices for patch changes. Its a very stable setup. But the sounds are dated, and I’d like to have some prerecorded harmonies.
So, I’m looking to updated, recognising that I have 150 songs already, and dont want to spend months re-recording everything. If I move to a Laptop, I also want to be certain that the time between songs is very short.
Could someone help me with this? Andrew W (andrewbanker@me.com)
0
Often I think it’s a pity there isn’t a standard like Native Instruments “Stems” m4a file that can also contain MIDI data at high accuracy. Having virtual instruments would be luxury, but to start, just a bare bones multi-channel audio format (m4a?) which can also multiplex in the MIDI.
– Logic / Ableton / Protools sessions. It’s not really a format though. Lug around my lovely MOTU interface on tour? Prefer not to. Ideally a twin laptop Play12 setup.
– The IDORU-P1 seems maybe to do what I need. Not having a computer would give confidence just having 1 unit initially. I see the USB port, but would be nice to also see a MIDI in/out port (so you can be sure it does this). Plus I also want to do the odd track without backing. This little pedal is inobtrusive enough for that. Can it do live looping? Not sure. Seems not to be real.
– Then perhaps so does the Unity Game Engine, as it runs on mac, PC, linux, mobile, but also Playstation, Xbox. This way, I can just take a playstation and an xbox on tour. But I’d have write my own game. It could also run the lighting show in funky way. It would probably go out of sync though.
– Maybe a two Raspberry PI could also run this simple game sending MIDI vis USB Audio.
– Reaper is a good simple cross platform host, there is also Ardour, Digital Performer.
– FMOD / trackers seem too oldschool.
– Pedal Player looks good but they didn’t say it can playback MIDI out, they say it can receive programme change events etc.
– A “dumb terminal” like a 4 track or Boss BR-studio could just “play down” a recording from Logic.
– Tracker mod formats come close but I’ve not seen one with super precise MIDI timing.
– https://livetraker.com/v4/6/ This looks like the ticket.
0
Hi Nick,
Great write up.
Originally I was looking to create a set up similar to the MOTU /D8 route, but I am now looking to create an all-in-one set up using the X32 rack with IEMs – which is when I came across this page…
Would it be possible to use ONLY the X32 to run back tracks AND IEM mixes?
What additional gear would I need?
It would be two wireless IEM systems (drummer connecting direct), 1 wireless guitar (amp going direct digitally to FOH) and 1 wireless mic.
Backtracks would be ran through Ableton Live.
Does the X32 work as an audio interface as well? Would we be limited to the amount of back tracks we could send to FOH?
All this is so confusing as a new comer haha!
Thanks in advance.
0
Thanks, Jamie!
First off, the X32 does work as an audio interface. That said, it’s pretty finicky. I can’t recall if you’re limited on the use of the X32 while using it in USB mode. Actually, I’m pretty sure you lose some outputs (8 if I’m not mistaken).
I can’t say for sure without testing myself, but I think you’re still going to want some sort of playback solution, like the Playaudio 12.
0
I use the Cymatic LP16 in my Madness Tribute band. It’s a dedicated hardware unit which is much simpler than rigging up a laptop and audio interface. I’ve always been worried about having a valuable laptop on stage because of it being a target for thieves. It’s simple to operate with dedicated buttons for each function and a built in LCD display. The songs are stored on a USB flash drive. D/A Converters aren’t great but it’s perfectly fine for most bands. It supports 16 tracks with 16 individual outputs and midi too. It also has a footswitch input and a dedicated headphone output.
https://cymaticaudio.com/lp-16-productpage/
0
Hi,
Thanks for this very helpful and detailed article! One thing I would like to point out is that all MOTU 828 outputs are balanced +4 dBu so you can connect them directly to any modern mixer without any DI box. It means you can cut the cost in half by simply dropping the Radial Pro-D8!
0
I use a Zoom L12 live with backing tracks. For solo gigs, I use channels 11-12 for percussion/drums, 9-10 for keys/strings, channel 8 for bass and click track on channel 7. Still leaves 6 tracks for vocal microphones and guitars. If my bass player is on the duo gig, I just mute channel 8. If the drummer is with us on a trio gig, I also mute channels 11-12. The L12 has 5 different headphone mixes so you can use either wired headphone or earbuds, or IEMs. SD card holds a ton of songs. If you number the songs, you can have it in set list order, and use a foot switch to start the tracks.
0